
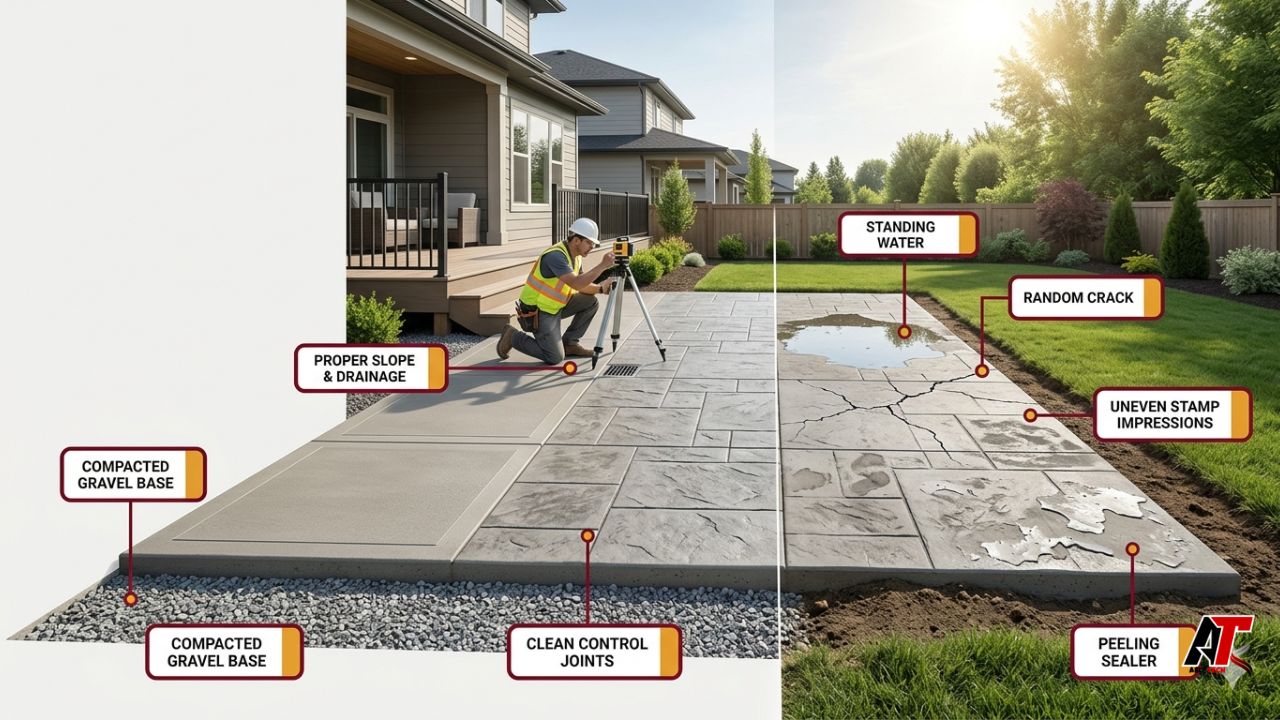
A stamped concrete patio can turn a plain backyard into a polished outdoor living area that resembles slate, flagstone, brick, or even wood. However, decorative concrete is not simply ordinary concrete with a pattern pressed into it. The base, concrete mixture, placement conditions, stamping window, joint layout, curing process, and sealer all have to work together.
That is why installation mistakes become expensive so quickly. A color problem may affect the entire slab. Poor drainage can send water toward the house. Badly planned joints can allow cracks to appear through the most visible parts of the pattern. In a freeze-thaw climate, a weak surface can scale or flake after winter exposure. Understanding common stamped concrete patio mistakes helps homeowners compare estimates and recognize shortcuts before the concrete truck arrives.
The goal is not to make every homeowner an expert finisher. It is to help you evaluate the plan behind the patio. Thoughtfully designed residential patios should balance appearance, movement, drainage, weather exposure, safety, and long-term maintenance rather than focusing only on the stamp pattern.
Mistake 1: Choosing the Pattern Before Planning the Site
The first costly mistake happens before construction starts: selecting a beautiful pattern without planning how the patio will function. Size, elevation, door clearances, furniture zones, steps, roof runoff, downspouts, irrigation, and walking routes should be resolved before the forms are set. Otherwise, a visually impressive slab may create awkward transitions or trap water where people enter the home.
Drainage deserves particular attention. Exterior concrete should direct water away from buildings and avoid low spots where puddles can remain. American Concrete Institute guidance for exposed slab areas notes the importance of slope and freeze-thaw resistance. The exact slope and elevation should be decided for the individual property, because an overly steep patio is uncomfortable while an under-sloped patio may hold water. Ask the installer to show the intended high and low points, explain where runoff will go, and account for downspouts before pouring.
Design also affects cracking. Narrow projections, inside corners, L-shaped areas, and abrupt changes in width concentrate stress. If the patio needs curves, fire-pit areas, borders, or an outdoor kitchen, these features should be coordinated with the joint plan and slab layout. A good design looks attractive because the technical details have been integrated, not hidden.
Mistake 2: Treating Base Preparation as an Invisible Place to Save Money
Concrete performs only as well as the material supporting it. Removing a few inches of soil and pouring over loose, wet, organic, or uneven ground can lead to settlement, rocking sections, water accumulation, and cracks. The problem may not appear immediately. It can become visible after repeated rain, snowmelt, loading, or seasonal ground movement.
Proper preparation begins with evaluating the existing soil and removing unsuitable material. The base must then be graded and compacted in controlled layers using equipment appropriate for the site. The needed depth and aggregate type depend on soil conditions, drainage, slab use, climate, and local practice. Homeowners should be cautious when an estimate lists only ‘site preparation’ without explaining excavation, base material, compaction, and disposal.
Reinforcement should also be discussed clearly. Reinforcing steel, welded wire reinforcement, or fibers may help control crack width or hold sections together, but reinforcement does not replace a stable base, suitable joints, or proper curing. It must be positioned and supported correctly rather than left on the ground or casually pulled upward during placement. Before signing, ask what is going below the slab, how it will be compacted, and how reinforcement will be kept at the intended elevation.
Mistake 3: Using the Wrong Concrete Mix or Adding Water at the Jobsite
A wet, highly workable mixture may look easier to place and stamp, yet adding excessive water can reduce concrete quality and create more bleeding, segregation, shrinkage, and surface weakness. National Ready Mixed Concrete Association guidance warns against obtaining high slump by adding water at the jobsite. Workability should come from a properly specified mixture and, when appropriate, compatible water-reducing admixtures rather than an uncontrolled hose.
Climate exposure matters as well. Patios in areas with freezing and thawing need a mixture designed for that exposure. Air-entrained concrete contains microscopic air spaces that help relieve pressure when water freezes inside the concrete. NRMCA guidance for exterior slabs exposed to severe freeze-thaw conditions recommends quality air-entrained concrete and identifies mixture strength, finishing, curing, and deicer use as important durability factors.
The homeowner does not need to dictate a universal psi, slump, air content, or admixture package. Those details should match the project specification, aggregate size, weather, delivery time, finish, and local requirements. The useful questions are: What mix is being ordered? Is it suitable for exterior freeze-thaw exposure? Who is authorized to change it? How will hot, dry, windy, or cold conditions be handled? A contractor who can answer those questions is less likely to improvise during the pour.
Mistake 4: Underestimating the Skill and Timing Required for Stamping
Stamped concrete has a narrow working window. The surface must be firm enough to support workers and hold the texture, but soft enough to accept a complete impression. If stamping begins too soon, mats can sink, edges can deform, and the surface may become uneven. If it begins too late, impressions can be shallow, incomplete, or inconsistent. Large patios make timing harder because the first concrete placed may be ready while another section is still being screeded.
Finishing errors can be just as damaging. NRMCA guidance advises waiting until bleed water has disappeared before subsequent finishing and warns against sprinkling water or dry cement onto the surface to make finishing easier. Decorative work also requires experienced crews who understand color hardeners, integral color, release agents, stamp alignment, texture depth, hand detailing, and edge treatment.
Ask how many crew members will be present, how the pour will be sequenced, and what happens if weather changes. Review actual projects with similar patterns rather than relying only on manufacturer sample boards. Pattern alignment should look natural, edges should be detailed, and repeated textures should not create obvious visual lines. The cheapest crew may be costly if the entire visible surface records rushed timing forever.
Mistake 5: Hiding or Delaying the Control-Joint Plan
Concrete naturally changes dimension as it loses moisture and experiences temperature shifts. Cracks cannot be eliminated entirely, but planned joints encourage cracking to occur at controlled locations. NRMCA describes joints as preplanned cracks and recommends that panels be square or nearly square, with long, narrow, L-shaped, or irregular panels avoided where possible. Joint spacing and depth must suit the slab thickness and layout.
Stamped patterns sometimes tempt installers or homeowners to minimize joints because straight saw cuts appear to interrupt the stone or wood effect. That trade-off is risky. A random crack across the center of an expensive decorative panel is usually more noticeable than a joint that was intentionally incorporated into the design. Joint lines can often follow pattern seams, borders, changes in geometry, or transitions between functional zones.
Timing matters too. NRMCA finishing guidance states that joints may be tooled before set or saw-cut after hardening, and that saw cutting should occur as soon as the concrete is hard enough not to be torn by the blade. Ask for the joint layout before the pour, including isolation around columns, walls, steps, or other restraints. A promise to ‘figure it out later’ is not a joint plan.
Mistake 6: Rushing Curing, Cleaning, and Sealing
Fresh concrete does not become durable simply because the surface looks hard. Curing maintains suitable moisture and temperature so cement hydration can continue. NRMCA explains that curing should begin after placement and finishing and generally continue for a sufficient period, commonly three to seven days depending on the system and conditions. Dry air, sun, wind, and temperature swings can accelerate moisture loss and raise the risk of surface weakness or shrinkage cracking.
Stamped concrete adds another complication: the release material must be removed at the right time and with the right method, while preserving color and texture. Sealing too early can trap moisture or interfere with curing. Applying sealer to a damp, dirty, or poorly prepared surface can cause whitening, bubbling, peeling, uneven gloss, or weak adhesion. Heavy applications may also make deeply textured concrete slippery when wet.
The contractor should specify the curing method, expected wash schedule, sealer type, application rate, slip-resistance strategy, and waiting period before furniture or regular use. Maintenance expectations should be realistic. Sealers wear differently depending on UV exposure, traffic, snow, irrigation, cleaning products, and winter chemicals. Instead of accepting a vague instruction to ‘reseal every few years,’ ask what signs indicate that the surface is ready and which products remain compatible with the original system.
Mistake 7: Hiring on Price Alone and Accepting a Vague Contract
Stamped concrete is permanent, highly visible work, so contractor selection should extend beyond the lowest square-foot figure. Compare the scope behind each number. One proposal may include excavation, compacted base, reinforcement, drainage corrections, multiple colors, detailed borders, curing, washing, sealing, cleanup, and warranty language. Another may omit several of those items while appearing cheaper.
For a Colorado project, an experienced concrete contractor in Colorado Springs should be prepared to discuss freeze-thaw exposure, local soil behavior, weather protection, air-entrained mixtures, drainage, and the timing of exterior decorative work. Verify business identity, insurance, references, relevant licenses, and whether permits are required for any part of the work. The City of Colorado Springs states that concrete work in the public right-of-way requires appropriate licensing and permits, so driveway aprons, sidewalks, or connected public improvements may involve requirements that a private backyard slab does not.
A useful written contract identifies dimensions, thickness, base preparation, reinforcement, concrete specification, colors, patterns, borders, joint locations, curing, sealer, access, landscaping protection, change orders, payment stages, cleanup, exclusions, and warranty terms. It should also explain acceptable appearance variation. Decorative concrete is handcrafted, so subtle color and texture differences are normal; unexplained blotches, poor impressions, drainage failure, or missing scope are different matters.
Do not rely only on perfect close-up photographs. Visit completed work when possible and ask how it performed through at least one winter. A professional estimate should reduce uncertainty, not move every important decision to pour day.
A Practical Pre-Pour Checklist
Before authorizing the installation, confirm that the layout works with doors, steps, furniture, utilities, downspouts, and landscaping. Review elevations and drainage direction. Ask for a written description of excavation, base material, compaction, reinforcement, concrete mixture, weather plan, stamping crew, joint layout, curing method, sealer, and maintenance.
Check samples outdoors in natural light, because colors can look different on screens or inside a showroom. Confirm whether the sample represents integral color, surface color, release color, stain, or a combination. Decide how borders and joints will meet. Photograph the site and mark irrigation, lighting, drainage, gas, or electrical features before excavation.
Finally, avoid making last-minute additions during placement. A larger fire-pit pad, extra step, new curve, or different border can change quantities, elevations, joints, and crew timing. Resolve design choices early so the team can focus on execution. For broader homeowner planning and digital research resources, aelftech.com provides additional practical guidance for comparing services and organizing project decisions.
Final Thoughts
The most expensive stamped concrete patio mistakes are rarely about choosing the wrong stone pattern. They come from weak planning, unstable support, unsuitable concrete, rushed finishing, poor joint placement, inadequate curing, or an incomplete contract. These defects are difficult to hide because the structure and appearance are created at the same time.
A successful patio begins with questions that protect performance: Where will water go? What supports the slab? Is the mixture appropriate for the climate? Who controls jobsite water? When and where will joints be cut? How will the concrete be cured and sealed? What is included in writing? When homeowners evaluate those details before the pour, they greatly improve the chance of receiving a patio that looks intentional and performs reliably for years.
Leave a Reply